
Okay guys, here’s the low down on our first project. It’s a major one! It will be challlenging and a lot of fun. We think it will probably take weeks to complete.
SMART BIRD FEEDER PROJECT
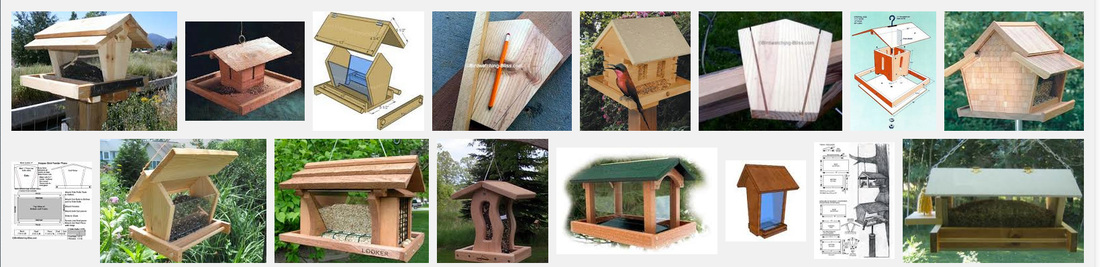
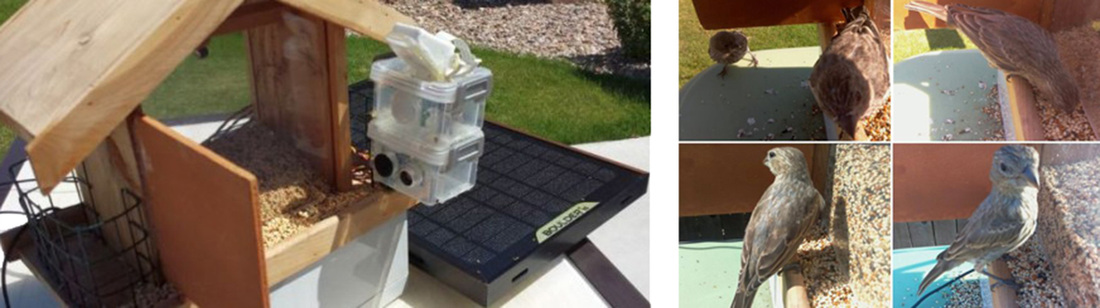
We’re each going to build a smart bird feeder to take home when completed and put up somewhere in our yard. And, then, to observe the behavior of our local birds toward this new home. Do they like it and use it, or not? we're also going to build one to leave on campus so you and you teachers can observe how the birds are doing
This won’t be an ordinary bird house. For consturction we’ll need to use wood and metal materials. Other materials, like recyclables, are optional too. This will challenge you to learn the use of tools that are probably new to you. Of course it should look really cool – and original – so it will need to be very well planned and decorated. And, it will be smart.
What do I mean by smart? Well, it will have electronics that communicate from the feeder to nearby computers. It might send text message or a Tweet each time a bird lands, or maybe take a picture and wirelessly send it each time a bird starts feeding. We'll need to explore the options together and figure out what we want the smart features to be. Then we'll need to research what it will take to build.
We're very excited about this project!
Smart Bird Feeder
Solar-powered remote -tweeter-bird-feeder
 WE HAVE TWO MAIN GOALS FOR THIS PROJECT First . . . to develop your skills in working with a range of tools needed to work with wood, metal, and electronics. Computer coding will also be involved. Don’t worry, we do not expect that you will know how to do everything. That’s what us mentors are for. Second . . . to introduce you to the idea of design thinking. Usually when people use the word design they are referring to how something looks. But design thinking is more than that. Design thinking is about wanting to do something and then figuring out how to do it. Design thinking requires a problem solving mind set. Design thinking follows a very specific process. You will be learning this process and applying it in the Smart Bird House Project. DESIGN THINKING So What is the Design Thinking and the Design Thinking Process? Design thinking focuses on the user. Who (or what) are you designing for? it’s about gaining a deep understanding of the needs and motivations of the person or group that you are designing for. Design thinking is collaborative and requires conversations, brain storming and team work. It’s experimental because it creates a space to try something new. It gives you the permission to unlearn, fail and to make mistakes in the process of coming up with new ideas. Getting it right the first time is not essential, or even expected. But learning from your mistakes and correcting them is an essential part of Design Thinking. Design Thinking Schematic Diagram 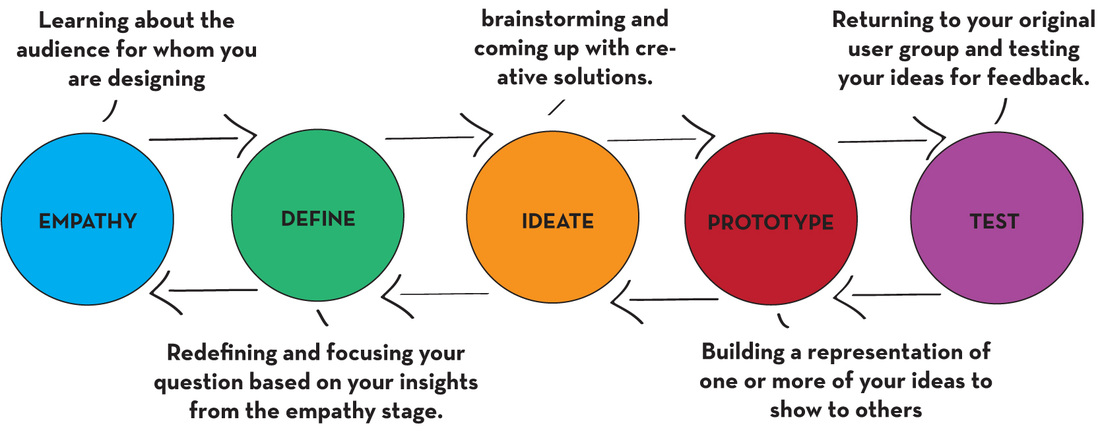 |
In short, design thinking incorporates three main components:
It’s centered on the user.
It is collaborative
It is experimental.
To achieve all the three goals we all have to openly participate in the creative process. There’s no such thing as a wrong idea so we can’t worry about that. In other words, we can’t worry about the fear of failure. And to be experimental.
We have to innovate. We have to believe in ourselves.
We have to think different.
We’ll use three words to describe the three parts of the design thinking process: Immerse. Invent. Implement.
Immerse
When we start with the process of design thinking, the first phase is Immerse. Immersion is sort of like swimming– get yourself completely wet. Get deeply involved in what you are learning. This phase is about research. Talk to experts, use the internet and take notes to keep track of what you've learned.
We can’t solve problems to satisfy everyone so it’s vital that we define our stakeholders – the group we are designing for. We need to build what is called a user profile by focusing on the WHO – who is the user we are designing for?
When you feel you understand who you are designing for and you can predict what they need and want, you're ready to move on.
Invent
Now you're ready for Phase II, Invent. Here we need to define the problem clearly and create potential solutions. The invent phase has two steps – Define and Create.
Define means to arrive at a clear understanding of the user and his or her needs based the understanding gained from your research. Then comes Create. Thinking of solutions the the part w most of us love to do and cannot wait to jump into.
But you can't rush it. The important thing to remember here is that without a definition of the problem we aim to solve and a clear understanding of the intended user, even the most creative ideas don’t have any meaning. It's not enough if something sounds great to you or your friends. You need to ask yourself if it's right for your users (birds, in this case). Sorry, but it doesn't matter if you think it's cool. The birds have to think it's cool too for there to be success!
The Create step answers the question: what are the possible solutions to solve the problem and to meet the needs of the user. The goal of this step is to come up with any and all possible solutions to the challenge.
Implement/Build
To Implement means to create working solutions and get user feedback. Here we could perhaps use the word Build. We must pick among the ideas we have considered and select the one we feel is best.
Then we build, first, a prototype. The word prototype refers to mock-ups, model of the finished projects. Sometimes one will do it. Sometimes we need to build several to get it right.
For us makers what prototype does is give you a simple model you can get feedback on. Prototypes usually lead the way to the user test. Getting people in your select group to try out what you have made.
This is not always possible before the you have built the finished proejct. This will be true with our birdhouse project. In this case, we will try to onsult experts and looks at similar projects that have already been done.
This phase should not be bypassed if at all possible. It is one of the most critical steps in the design process.
After having build your finished proejct and reaching your goal, don’t forget to look back to to see how far you have traveled. And to judge the journey. We can keep revisiting the Immerse, Invent and Build phases, doubling back as needed. Design Thinking does not require always going forward. Sometimes doubling back and repeating part of the process is necessary.
With all this in mind, the Design Thinking schematic we presented above is worth looking at again. Take a look at the left facing arrows. Some times we have to go back, repeat, and then go back again, to really do get it right.

It is a journey to train oneself first to become a designer, and then into into a design thinker. Luckily this process is not limited to realm of design or it might not be worth all the effort. Design thinking can be applied to solving all manner of problems.
If you MakerKids accomplish only one thing in our program it should be to learn and understand design thinking. It is a very powerful tool for learning that can be applied to many things.
In our next post you'll get the details about the Smart Bird Feeder project.
If you MakerKids accomplish only one thing in our program it should be to learn and understand design thinking. It is a very powerful tool for learning that can be applied to many things.
In our next post you'll get the details about the Smart Bird Feeder project.
 RSS Feed